1. Match the clip to the post before reaching for the tool
To install T post clips, place the mesh against the studded face of the steel line post and use the clip shape intended for that post and wire. A formed clip holds the wire at a support; it does not replace an end tie, brace or roll splice. Complete the fence system's bracing and tensioning sequence before final attachment.
| Part | Check on the actual sample | A mismatch looks like |
|---|---|---|
| Post section and studs | Clip reaches around the back and seats at the fixing point | Clip must be stretched open or slips past the stud |
| Line wire and knot position | Ends can form around the intended wire with clearance | A knot blocks the tool or the wire is pinched |
| Clip end shape | Bender hole, slot or screwdriver fits the intended end | Tool slips off or distorts the loop |
KUNYU's existing galvanized clip options include a 2.6–2.8 mm wire-diameter candidate for standard 1.25/1.33 lb/ft studded posts. An 11.5 ga clip is a separate option. Compare the actual section, reach and steel-wire diameter; post weight alone cannot establish fit.
2. Choose the T post clip tool by the clip design
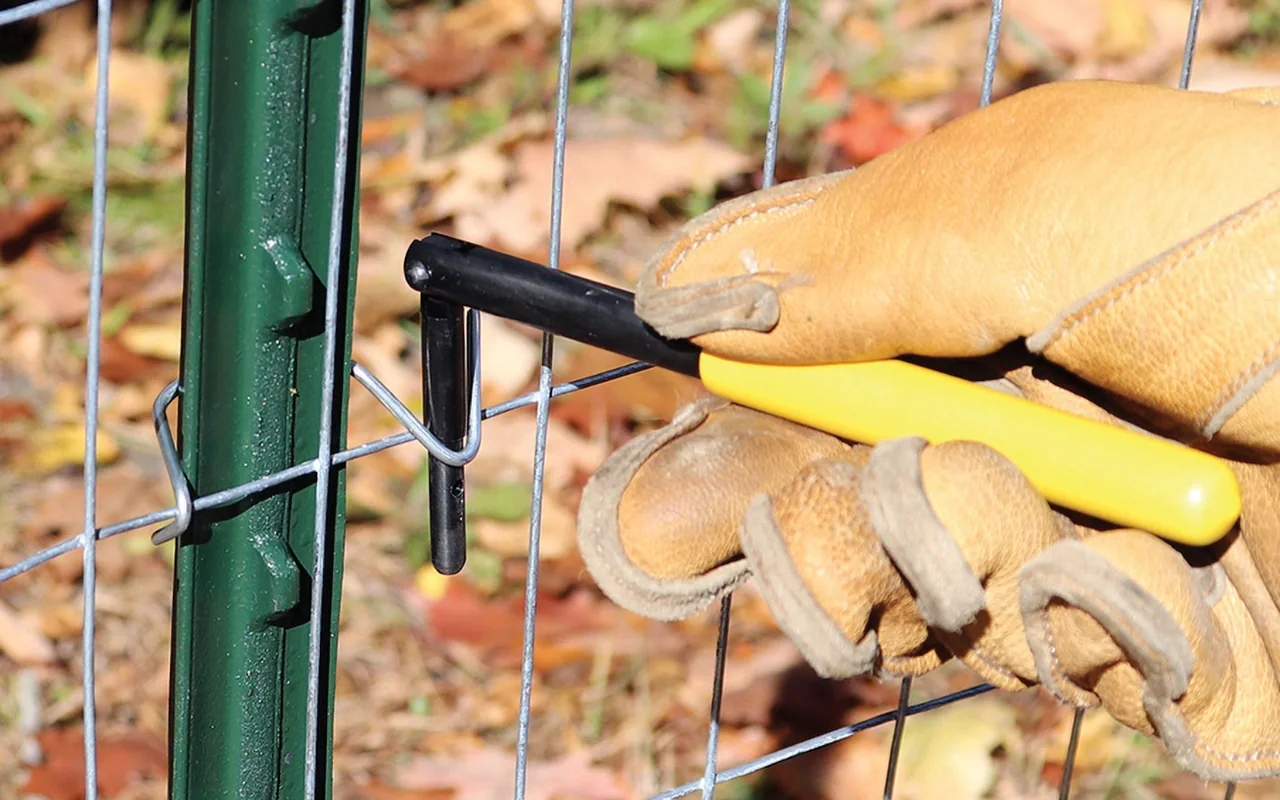
Fencing pliers can grip and bend a conventional wrap clip. A dedicated bender gives leverage at its shaped end and can be more convenient for repeated work. A screwdriver works only where the clip's loop and instructions allow it. Kerbl's formed-clip instructions, for example, describe bending the ends with pliers or a screwdriver.
Before a large installation, trial the selected clip, post and wire together. Check handle clearance between the mesh openings and knots. Tool length can matter as much as leverage: a long handle that cannot swing through the available space may be the wrong tool.
Bring gloves and eye protection. Have wire-rated cutters for any permitted trimming. A post driver installs the post and a stretcher tensions the run; neither forms the finished clip. Ordinary metal clips provide no electrical insulation.
3. Install a conventional wrap clip in order
- Set the wire at the scheduled fixing point. Keep the mesh aligned with the post and avoid placing the clip over a bulky mesh knot.
- Seat the clip behind the post. Bring its ends forward to the fence wire without using the clip to pull loose mesh into tension.
- Engage the first end. Hook it around the intended line wire so the clip stays seated as the other end is formed.
- Form the remaining end. Use the selected bender or pliers in the direction specified for that clip. Complete the other end where the design requires it.
- Inspect the connection. Check the back of the post, both ends, wire movement and coating. Remove exposed sharp tails from animal contact.
This is the general order for a wrap clip, not a universal number of turns. A spring clip, looped clip or powered clip system can have a different attachment detail.
4. A worked tool example: TWISTER and BANTAM
The TWISTER maker's written sequence shows how a particular tie is formed. First prepare its short arm, then place the tie around the post and hook that arm over the wire. Insert the long arm into the tool, bear against the fence wire and push forward while wrapping. Finish the short arm in the opposite direction using the illustrated orientation.
The maker presents TWISTER for barbed wire and the shorter BANTAM for net wire. This example explains why tool access and tie geometry matter; it does not establish that every KUNYU clip has that same wrap pattern. A drill attachment likewise needs its matching clip system. Compare clip tools, wire wraps and permanent joiners before substituting one operation for another.
5. Fix the fault instead of adding more force
| Observed fault | Check first | Correction |
|---|---|---|
| Clip lifts away from the post | Reach, stud position and formed ends | Re-seat or use the correct clip geometry |
| Bender strikes a knot | Fixing location and handle clearance | Use the approved adjacent location or a suitable tool |
| Wire is crushed or coating cut | Clip size, wrap and tool contact | Replace damaged parts and correct the forming method |
| Entire run sags | End braces, terminations and tensioning history | Repair the system rather than tightening every line-post clip |
6. Calculate quantities from the attachment schedule
Example only: 40 steel line posts with four specified clips each need 160 installed clips. Add 16 buyer-selected spares to reach 176. At 25 per pack, eight packs supply 200, leaving 24 above that requirement. Reusable benders are counted by crew, not multiplied by the number of clips.
The Everbilt welded-wire sheet specifies approximately four to five clips per post for its installation. That is a system-specific example, not a fixing schedule for every woven fence height.
For repeat supply, send KUNYU the post section, clip drawing, wire size and approved attachment pattern. List woven wire fence clips, wood-post staples and end connectors separately. Use our post-spacing guide for support counting and the staple guide for timber fixings. Quantities and packing can be reviewed for FCL or LCL shipment.